Scan your furniture in 3D with an iPhone
A step-by-step guide for suppliers: turn a sofa, headboard or rattan chair into a 3D model with an iPhone Pro or an Android phone, ready for the 3D view and 'place it in your room' on BTAB.
By The BTAB Team
Shoppers who can spin a sofa around, and see it standing in their own lounge room at true size, buy with more confidence. When Brosa added "View at Home" to its product pages, it reported 43% higher conversion.
For simple pieces we build the 3D model ourselves, straight from your listed measurements. Some shapes a model builder can't fake: a buttoned sofa, a carved headboard, a woven rattan chair. For those, the fastest route is the iPhone in your pocket and a short session with the product.
This guide shows exactly how.
What you need
| What | Why |
|---|---|
| An iPhone 12 Pro or later Pro model (or iPad Pro 2021 or later) | These have the LiDAR depth sensor Apple's scanner needs. A non-Pro iPhone won't work. On Android? See the Android section further down. |
| Apple's free Reality Composer app | From the App Store. It has Apple's guided Object Capture scanner built in. |
| A patterned mat or rug | Plain furniture on a plain floor is hard for the scanner to track. A pattern underneath gives it something to lock onto. |
| A small colour chart (optional) | Anything with known colours, e.g. a printed colour card. It helps us check your finish colour. |
| Two soft lights, or a bright overcast spot | Diffuse light only. Avoid direct sun and hard lamps. |
| About 1 metre of clear floor all the way round | You'll walk laps around the piece. |
Step 1: Prepare the product
- Assemble it fully, as a customer would see it: legs on, handles on, cushions in place.
- Plump and square the cushions, then leave them alone. The scanner needs the object to stay still. Anything that shifts between laps blurs the model.
- Remove or cover anything shiny or see-through: glass tops, mirrors, chrome feet, protective plastic. Apple advises avoiding reflective, transparent and very thin parts, because the scanner can't read them. We rebuild glass and mirror ourselves.
- Wipe off dust and fingerprints. The camera sees them.
Step 2: Set up the space
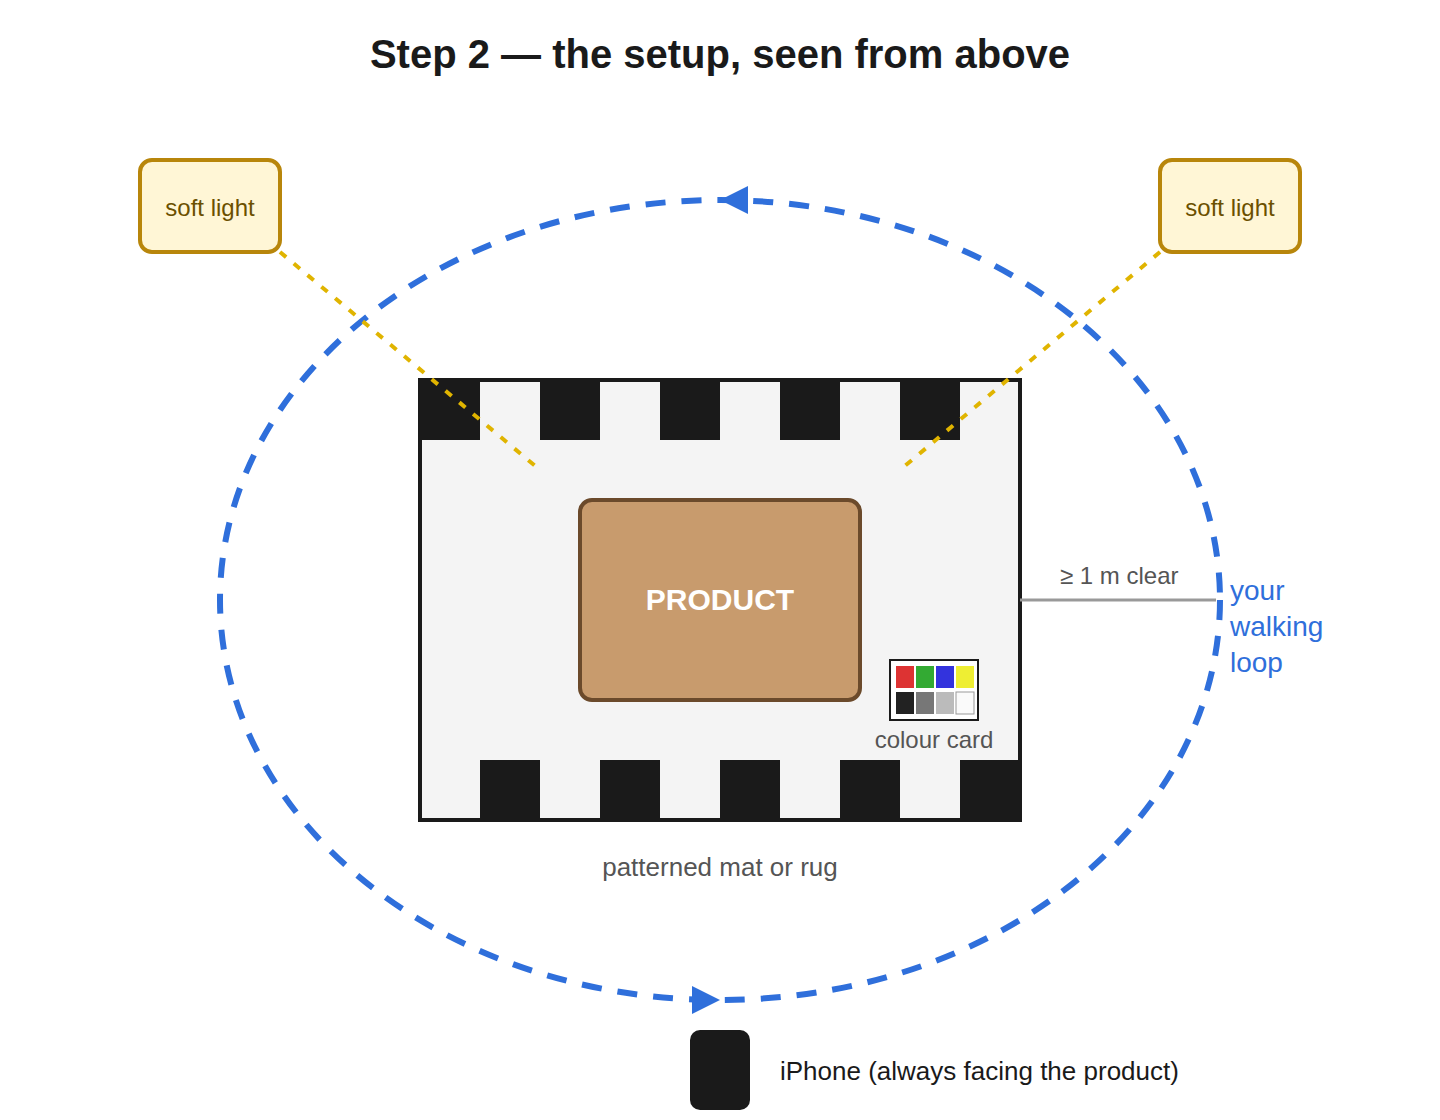
- Lay the patterned mat or rug flat and stand the product in the middle of it.
- Put the colour chart on the mat where it's visible and not hidden behind a leg.
- Light it softly from two sides. Apple recommends diffuse light to minimise shadows and reflections. A hard shadow gets baked into the model as if it were paint.
- Clear a walking loop about a metre out from the piece all the way round.
Step 3: Start the scan
- Open Reality Composer and start a new Object Capture.
- Point the phone at the product. A 3D box appears around it.
- Drag the box handles so the box hugs the product: down to the floor and just past the edges. Leave out the walls and anything else nearby.
- Tap Continue. The app now takes photos automatically as you move.
Step 4: Walk three laps at three heights
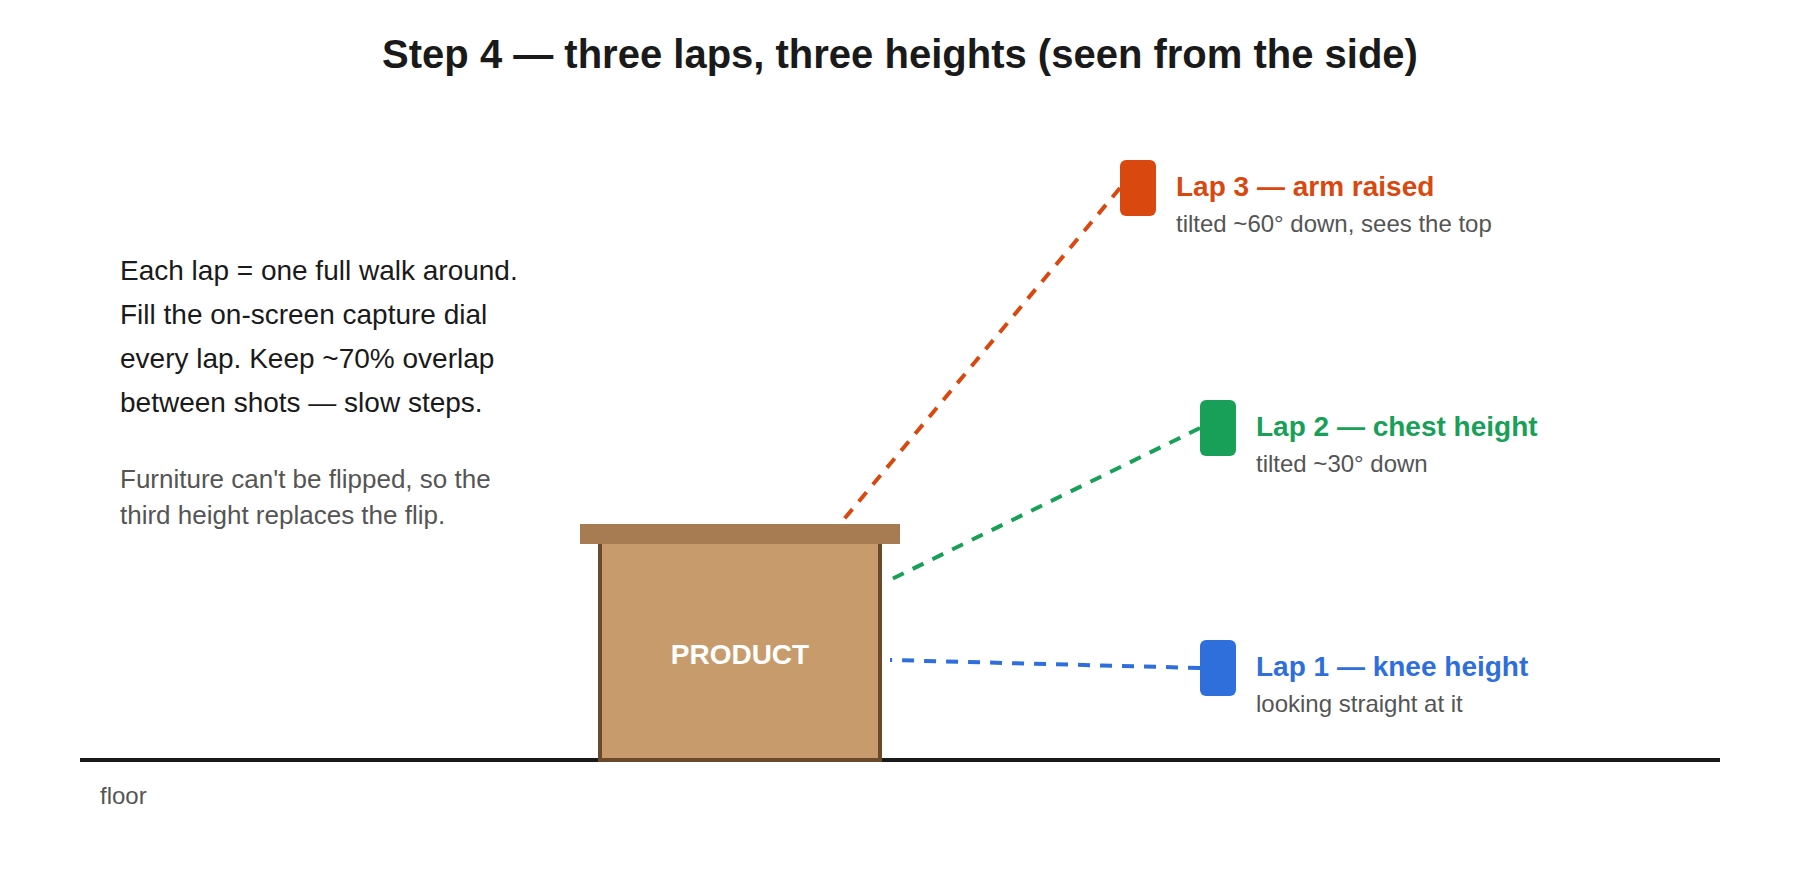
| Lap | Phone height | Aim |
|---|---|---|
| 1 | Knee height | Straight at the product |
| 2 | Chest height | Tilted about 30° down |
| 3 | Arm raised high | Tilted about 60° down, so it sees the top |
- Walk slowly and smoothly. If you move too fast, the app pauses and asks you to slow down.
- Keep the whole product on screen. Capture pauses when it leaves the frame.
- Fill the capture dial completely on every lap. Apple recommends three passes for the best result.
- Don't flip the furniture. Small objects get flipped over to scan the underside. For furniture, the high third lap does that job. Apple suggests three heights for anything that can't be turned over.
- Don't touch or move anything between laps.
Step 5: Let the phone build the model
Tap Finish. The iPhone processes the photos itself, which takes a few minutes, and produces a .usdz 3D file.
Step 6: Check it before you send it
- Open the model and tap AR. Place the virtual copy right beside the real piece.
- Walk around both. Check that the shape matches, that no chunks are missing (legs and arm ends are the usual culprits), and that the colour looks right.
- If something's missing, rescan. It's quicker than explaining the gap.
Step 7: Send it to BTAB
Send the .usdz file to your BTAB contact, with the product's SKU.
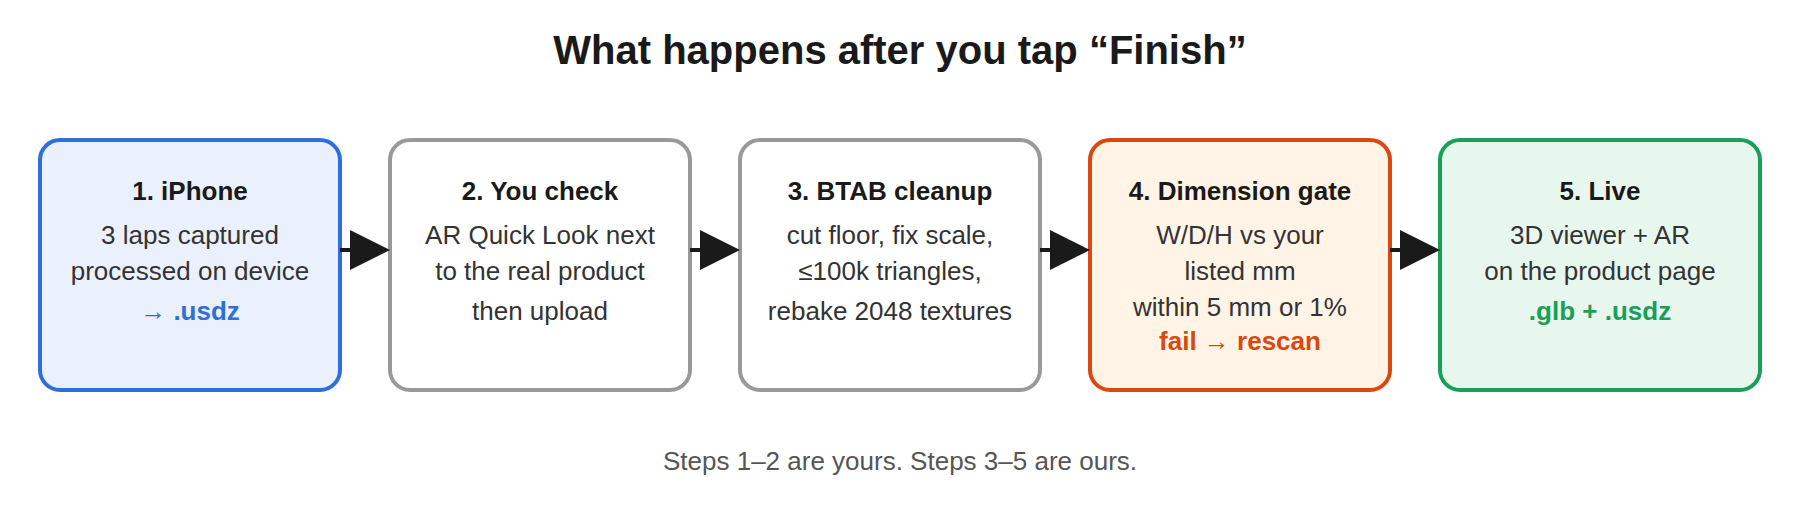
What we do with it:
- We cut away the floor and mat.
- We check the scale against your listed measurements.
- We slim the model down so it loads fast on phones.
- We run it through our dimension check: the model's width, depth and height must match your listing to within 5 mm or 1%, whichever is larger.
If it passes, it goes live on the product page as a 3D view you can place in your room. If it doesn't, we tell you which measurement disagrees. Sometimes it's the listing that's wrong, not the scan.
On Android? Use RealityScan Mobile
Android phones don't have Apple's scanner, but RealityScan Mobile, Epic Games' free app on Google Play, works the same way. Everything above about the product, the mat, the light and the three laps still applies. Only the app changes.
- Install RealityScan Mobile from Google Play and sign in with a free Epic account.
- Set up exactly as in Steps 1 and 2: product assembled, patterned mat underneath, soft light, a clear walking loop.
- Start a new scan. The app guides you with on-screen markers showing which angles still need photos.
- Walk the same three laps at knee, chest and raised-arm height (Step 4). Slow and steady, product always in frame.
- Build the model. RealityScan builds it in Epic's cloud, not on the phone, so you need an internet connection. It takes a few minutes.
- Check it against the real piece, as in Step 6.
- Download the
.glbfile to your phone and send it to your BTAB contact with the product's SKU.
Plain fabric not scanning well? Try KIRI Engine (Google Play). Its Featureless Object Scan mode is built for surfaces with little pattern, like plain upholstery. The free tier gives 3 exports a week. Export as GLB.
One difference from iPhone: Android phones have no depth sensor, so an Android scan doesn't know its real size. That's fine. We scale every scan to your listed measurements and then run the same dimension check, so a model only goes live if its shape fits your stated width, depth and height.
Quick troubleshooting
| Problem | Likely cause | Fix |
|---|---|---|
| App keeps saying "move slower" | Walking pace | Half the speed. Small side-steps. |
| Holes in the top | Lap 3 too low | Raise the phone higher and tilt it more. |
| Legs missing or melted | Thin parts on a plain floor | Keep the patterned mat under the legs. Add light low down. |
| Blotchy shine on the surface | Hard light | Diffuse the lights, or move to shade. |
| Model the wrong size | Box set too loosely | Drag the box handles tight to the product. |
| Glass or chrome looks broken | Expected | Leave it. We rebuild those parts. |
Sources
- Apple, Meet Object Capture for iOS (WWDC23)
- Apple, Reality Composer on the App Store
- Apple, Discover area mode for Object Capture (WWDC24)
- Epic Games, RealityScan Mobile
- CG Channel, RealityScan Mobile 1.8 and RealityScan 1.5 direct export
- KIRI Engine, export formats
- Plattar, Brosa case study